Smart Doorbell
Upgrade your traditional doorbell to a smart one using a Sonoff WiFi-powered relay. Automate silencing during sleeping hours, receive notifications on your phone, and integrate with Home Assistant.
| Skill | Cost | Time |
|---|---|---|
| 1 / 5 | ~10 Euro | ~45min |
Challenge / Annoyance
Conventional doorbells can't be automated to silence during children's sleeping hours, and they may go unnoticed when you're far from the chime or bell. But, with a Sonoff smart switch and some straightforward wiring adjustments, upgrading to a smart doorbell can be done in under an hour for around 10 Euros.
Solution - Hardware
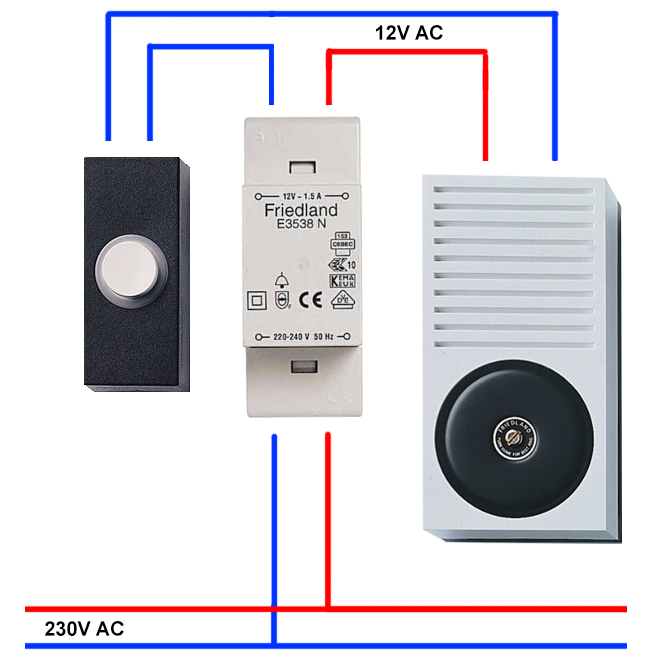
Most traditional doorbells have a transformer that is always powered, and the low-voltage AC power is run through the button on the outside of the house that switches the power from the transformer to the chime or bell.
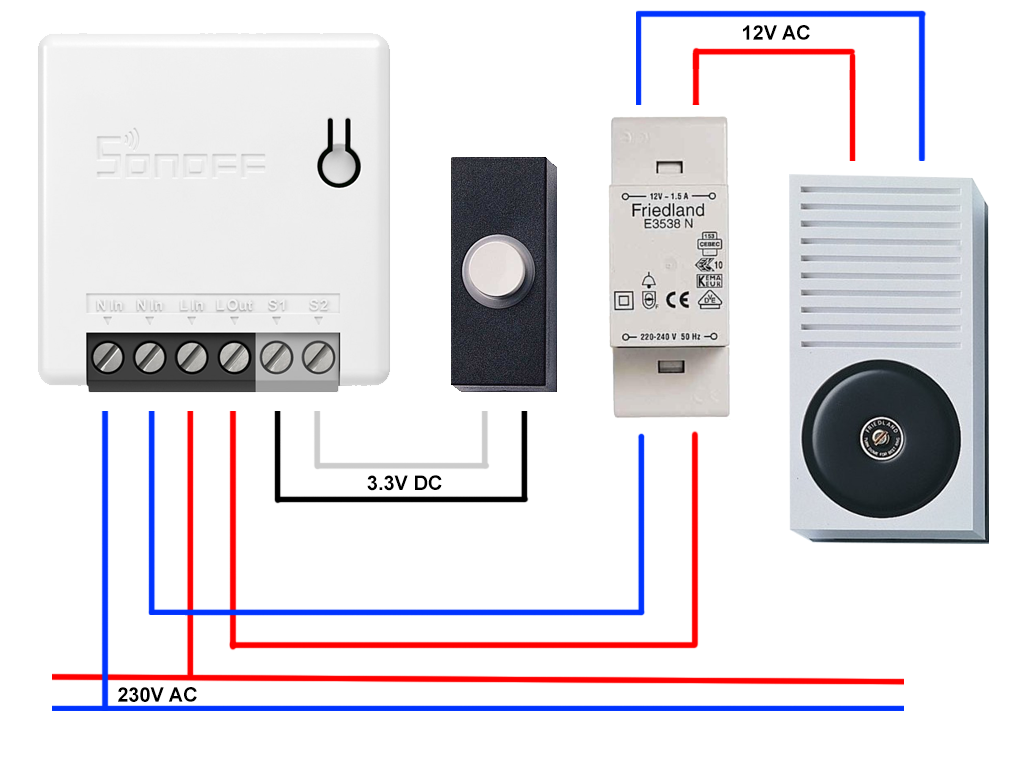
By incorporating a WiFi-powered relay into the system, you can detect the button's state, activate the bell separately, and integrate all components into Home Assistant.
Sonoff Mini vs. Shelly 1
Using a Sonoff Mini instead of a Shelly 1 offers the advantage of low(er) voltage on the button wires (3.3v instead of 12v), and the transformer only activates when the chime is triggered, saving an extra ~4W of standby power. When using a Shelly 1, use it in DC mode (jumper) and hook up an AC/DC transformer. This way, you'll prevent 230V AC from flowing through the button wires and avoid any possible risks.
Solution - Software
Our custom firmware includes auto-discovery functionality that automatically integrates the Smart Doorbell with your Home Assistant using MQTT. This enables you to activate the button, switch the chime, and obtain button status information via a sensor.
To simplify the setup process, we've integrated WiFiManager. First, flash the firmware, and the device will generate a passwordless Access Point (SSID: SHGio_Doorbell) for you to connect to. Then, visit http://192.168.4.1, enter your WiFi and MQTT details, save the settings, and your doorbell will appear in your Home Assistant.

Now, it is simple to create an automation that deactivates the chime during the children's sleeping hours and sends a notification to your mobile device whenever someone is at the door.
If you've attached a door sensor to your front door, you can automate the system to remove the notification on your phone once you've opened the door. And if you have a smart lock, you can set up an "Open House" switch in Home Assistant, allowing guests or kids to use the doorbell to open the door instantly.
Bill of materials
- Sonoff Mini R2
Off-the-shelf alternatives
Currently, many smart doorbell choices are available, such as battery-powered wireless solutions and doorbells with built-in cameras. However, if you're seeking an affordable and accessible method to update your current doorbell setup without needing batteries, this is an excellent alternative.
Conclusion
This upgrade is ideal for smart home enthusiasts who still use conventional doorbells. It enables you to receive notifications on your smartphone, even when you're away from home, and gives you the ability to automatically silence the bell/chime when you don't want to be disturbed.